Ford Explorer: Fuel System - General Information - 2.3L EcoBoost (201kW/273PS) / General Procedures - Fuel System Pressure Check
Special Tool(s) / General Equipment
.jpg) |
310-D009
(D95L-7211-A)
Fuel Pressure Test Kit |
Check
NOTE: This Fuel System Pressure Check is for the low pressure side of the system.
-
Release the fuel system pressure.
Refer to: Fuel System Pressure Release (310-00A Fuel System - General Information - 2.3L EcoBoost (201kW/273PS), General Procedures).
-
Disconnect the battery ground cable.
Refer to: Battery Disconnect and Connect (414-01 Battery, Mounting and Cables, General Procedures).
-
Disconnect the fuel supply tube quick connect coupling.
Refer to: Quick Release Coupling (310-00A Fuel System - General Information - 2.3L EcoBoost (201kW/273PS), General Procedures).
.jpg) |
-
Install the Fuel Pressure Test Adapter and the Fuel
Pressure Test Kit between the fuel supply tube and the fuel pump inlet.
Use Special Service Tool: 310-D009 (D95L-7211-A) Fuel Pressure Test Kit.
.jpg) |
-
NOTE: The fuel pump control module electrical connector was previously disconnected to release the fuel system pressure and must be reconnected to test the fuel system pressure.
Reconnect the fuel pump control module electrical connector.
-
Reconnect the battery ground cable.
Refer to: Battery Disconnect and Connect (414-01 Battery, Mounting and Cables, General Procedures).
-
NOTE: Carry out a Key ON Engine OFF (KOEO) visual inspection for fuel leaks prior to completing the fuel system pressure test.
NOTE: After completion of the fuel system pressure test, open the drain valve on the Fuel Pressure Test Kit and release any residual fuel into a suitable container prior to removing the tool.
Test the fuel system pressure to make sure it is within the specified range.
Refer to: Specifications (310-00A Fuel System - General Information - 2.3L EcoBoost (201kW/273PS), Specifications).
 Diagnosis and Testing - Fuel System - 2.3L EcoBoost (201kW/273PS)
Symptom Chart(s)
Symptom Chart: Fuel System
NOTE:
The fuel tank inlet check valve prevents spitback of fuel during and after refueling.
Diagnostics in this manual assume a certain skill level..
 General Procedures - Fuel System Pressure Release
Pressure release
With the vehicle in NEUTRAL, position it on a hoist.
Refer to: Jacking and Lifting - Overview (100-02 Jacking and Lifting, Description and Operation)...
Other information:
Ford Explorer 2020-2025 Service Manual: Removal and Installation - Rear Evaporator Rear Outlet and Inlet Line
Removal All vehicles NOTICE: During the removal or installation of components, cap, tape or otherwise appropriately protect all openings and tubes/fittings to prevent the ingress of dirt or other contamination. Remove caps, tape and other protective materials prior to installation...
Ford Explorer 2020-2025 Owners Manual: Roof Racks and Load Carriers (If Equipped)
WARNING: When loading the roof racks, we recommend you evenly distribute the load, as well as maintain a low center of gravity. Loaded vehicles, with higher centers of gravity, may handle differently than unloaded vehicles. Take extra precautions, such as slower speeds and increased stopping distance, when driving a heavily loaded vehicle...
Categories
- Manuals Home
- 6th Generation Explorer Owners Manual
- 6th Generation Explorer Service Manual
- Description and Operation - Jacking and Lifting - Overview
- Body and Paint
- General Procedures - Rear Camber Adjustment
- New on site
- Most important about car
Gauges
4 Inch Display
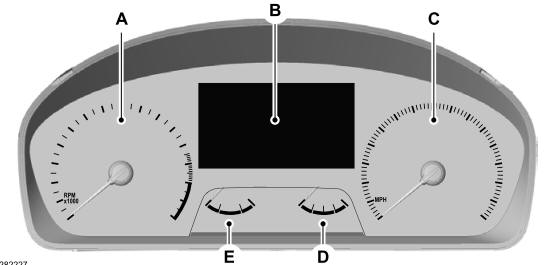
A - Tachometer.
B - Information display.
C - Speedometer.
D - Fuel gauge.
E - Engine coolant temperature gauge.