Ford Explorer: Engine Emission Control - 2.3L EcoBoost (201kW/273PS) / Removal and Installation - Exhaust Gas Recirculation (EGR) Valve
Ford Explorer 2020-2025 Service Manual / Powertrain / Engine / Engine Emission Control - 2.3L EcoBoost (201kW/273PS) / Removal and Installation - Exhaust Gas Recirculation (EGR) Valve
Removal
NOTE: Removal steps in this procedure may contain installation details.
-
NOTICE: Do not pull the engine appearance cover forward or sideways to remove. Failure to press straight upward on the underside of the cover at the attachment points may result in damage to the cover or engine components.
-
Remove the engine appearance cover nuts.
-
Place your hand under the engine appearance cover at
each grommet location and push straight up to release each grommet from
the studs.
-
After all of the grommets have been released from the studs, remove the appearance cover from the engine.
-
Remove the engine appearance cover nuts.
.jpg) |
-
Remove the air cleaner outlet pipe.
Refer to: Air Cleaner Outlet Pipe (303-12A Intake Air Distribution and Filtering - 2.3L EcoBoost (201kW/273PS), Removal and Installation).
-
Remove the cowl panel.
Refer to: Cowl Panel (501-02 Front End Body Panels, Removal and Installation).
-
Disconnect the HO2S electrical connector.
.jpg) |
-
-
Remove the fastener.
Torque: 97 lb.in (11 Nm)
-
Remove the fastener.
Torque: 97 lb.in (11 Nm)
-
Remove the fastener.
Torque: 97 lb.in (11 Nm)
-
Remove the fastener.
Torque: 97 lb.in (11 Nm)
-
Remove the fastener.
.jpg) |
-
-
Disconnect the electrical connectors.
-
Detach the retainer and clip.
-
Disconnect the electrical connectors.
.jpg) |
-
Disconnect the electrical connector.
.jpg) |
-
-
Remove and discard the EGRvalve gasket.
-
Remove and discard the EGRvalve studs.
-
Remove the bolt.
-
Remove and discard the EGRvalve gasket.
.jpg) |
Installation
-
-
Install the new EGR valve gasket and studs.
Torque: 44 lb.in (5 Nm)
-
Inspect the o-ring and replace if necessary. Lubricate the o-ring with clean engine oil.
-
Install the bolt.
Torque: 97 lb.in (11 Nm)
-
Install the new EGR valve gasket and studs.
.jpg) |
-
To install, reverse the removal procedure.
 Description and Operation - Engine Emission Control - Component Location
EGR system
Item
Description
1
Crankcase Ventilation Tube.
2
EGR valve.
3
EGR cooler.
4
EGR coolant outlet temperature sensor...
 Removal and Installation - Exhaust Gas Recirculation (EGR) Back Pressure Sensor
Removal
NOTE:
Removal steps in this procedure may contain installation details.
Remove the air cleaner outlet pipe.
Refer to: Air Cleaner Outlet Pipe (303-12A Intake Air Distribution ..
Other information:
Ford Explorer 2020-2025 Service Manual: Removal and Installation - Keyless Entry Rear Antenna
Special Tool(s) / General Equipment Interior Trim Remover Removal Position the liftgate weatherstrip aside. Remove the liftgate scuff plate trim panel. Release the liftgate scuff plate trim panel clips...
Ford Explorer 2020-2025 Service Manual: Removal and Installation - Exterior Front Door Handle
Removal NOTE: LH (left-hand) side shown, RH (right-hand) side similar. NOTE: Removal steps in this procedure may contain installation details. Vehicles with passive entry Remove the front door window regulator and motor. Refer to: Front Door Window Regulator and Motor (501-11 Glass, Frames and Mechanisms, Removal and Installation)...
Categories
- Manuals Home
- 6th Generation Explorer Owners Manual
- 6th Generation Explorer Service Manual
- General Procedures - Rear Camber Adjustment
- Removal and Installation - Liftgate Trim Panel
- Engine
- New on site
- Most important about car
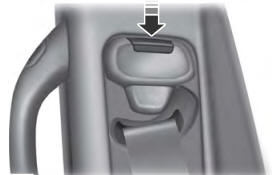
Seatbelt Height Adjustment
WARNING: Position the seatbelt height adjuster so that the seatbelt rests across the middle of your shoulder. Failure to adjust the seatbelt correctly could reduce its effectiveness and increase the risk of injury in a crash.
Copyright © 2025 www.foexplorer.com