Ford Explorer: Supplemental Restraint System / Removal and Installation - Front Impact Severity Sensor
Removal
.jpg) WARNING:
The following procedure prescribes critical repair steps
required for correct restraint system operation during a crash. Follow
all notes and steps carefully. Failure to follow step instructions may
result in incorrect operation of the restraint system and increases the
risk of serious personal injury or death in a crash.
WARNING:
The following procedure prescribes critical repair steps
required for correct restraint system operation during a crash. Follow
all notes and steps carefully. Failure to follow step instructions may
result in incorrect operation of the restraint system and increases the
risk of serious personal injury or death in a crash.
NOTE: Removal steps in this procedure may contain installation details.
-
Refer to: Pyrotechnic Device Health and Safety Precautions (100-00 General Information, Description and Operation).
WARNING:
Before beginning any service procedure in this
manual, refer to health and safety warnings in section 100-00 General
Information. Failure to follow this instruction may result in serious
personal injury.
-
Depower the SRS.
Refer to: Supplemental Restraint System (SRS) Depowering (501-20 Supplemental Restraint System) .
-
On both sides.
Remove the headlamp assembly.
Refer to: Headlamp Assembly (417-01 Exterior Lighting, Removal and Installation).
-
Remove the screws and the core support upper bracket.
.jpg) |
-
Remove the front impact severity sensor(s).
-
Disconnect the electrical connector(s).
-
Remove the bolt(s).
Torque: 106 lb.in (12 Nm)
-
Remove the front impact severity sensor(s).
-
Disconnect the electrical connector(s).
.jpg) |
Installation
-
NOTE: The front impact severity sensor mating surfaces must be smooth and allow for a flush attachment to each other.
To install, reverse the removal procedure.
-
Repower the SRS.
Refer to: Supplemental Restraint System (SRS) Repowering (501-20 Supplemental Restraint System) .
 Removal and Installation - Front Door Side Impact Sensor
Removal
WARNING:
The following procedure prescribes critical repair steps
required for correct restraint system operation during a crash. Follow
all notes and steps carefully...
 Removal and Installation - Occupant Classification System (OCS) Sensor - Vehicles With: Multi-Contour Seats
Special Tool(s) /
General Equipment
Flat Headed Screw Driver
Removal
WARNING:
The following procedure prescribes critical repair steps
required for correct restraint system ope..
Other information:
Ford Explorer 2020-2025 Service Manual: Removal and Installation - Front Wheel Bearing and Wheel Hub
Removal NOTICE: Suspension fasteners are critical parts that affect the performance of vital components and systems. Failure of these fasteners may result in major service expense. Use the same or equivalent parts if replacement is necessary. Do not use a replacement part of lesser quality or substitute design...
Ford Explorer 2020-2025 Service Manual: Description and Operation - Gasoline and Gasoline-Ethanol Fuel Systems Health and Safety Precautions
WARNING: Before working on or disconnecting any of the fuel tubes or fuel system components, relieve the fuel system pressure to prevent accidental spraying of fuel. Fuel in the fuel system remains under high pressure, even when the engine is not running...
Categories
- Manuals Home
- 6th Generation Explorer Owners Manual
- 6th Generation Explorer Service Manual
- General Procedures - Brake Service Mode Activation and Deactivation
- General Procedures - Transmission Fluid Drain and Refill
- Automatic Transmission - 10-Speed Automatic Transmission – 10R60
- New on site
- Most important about car
Gauges
4 Inch Display
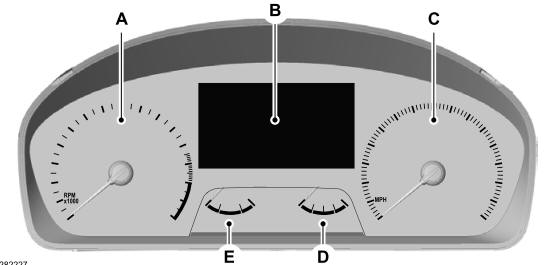
A - Tachometer.
B - Information display.
C - Speedometer.
D - Fuel gauge.
E - Engine coolant temperature gauge.