Ford Explorer: Body Closures / Removal and Installation - Hands-Free Liftgate Actuation Module
Ford Explorer 2020-2025 Service Manual / Body and Paint / Body and Paint / Body Closures / Removal and Installation - Hands-Free Liftgate Actuation Module
Removal
NOTE: Removal steps in this procedure may contain installation details.
-
Remove the rear bumper cover.
Refer to: Rear Bumper Cover (501-19 Bumpers, Removal and Installation).
-
Remove the following items:
-
Disconnect the electrical connectors and position aside the wirings.
-
Remove the retainer.
-
Remove the screw.
Torque: 19 lb.in (2.2 Nm)
-
Disconnect the electrical connectors and position aside the wirings.
.jpg) |
-
Pull out and remove the hands-free liftgate actuation module.
.jpg) |
Installation
-
To install, reverse the removal procedure.
-
NOTE: This step is only necessary when installing a new component.
Using a diagnostic scan tool, perform a LIN new module initialization following the on-screen instructions.
 Removal and Installation - Hands-Free Liftgate Actuation Lower Sensor
Removal
NOTE:
Removal steps in this procedure may contain installation details.
Remove the rear bumper cover.
Refer to: Rear Bumper Cover (501-19 Bumpers, Removal and Installation)...
 Removal and Installation - Hands-Free Liftgate Actuation Upper Sensor
Removal
NOTE:
Removal steps in this procedure may contain installation details.
Remove the rear bumper cover.
Refer to: Rear Bumper Cover (501-19 Bumpers, Removal and Installation)...
Other information:
Ford Explorer 2020-2025 Service Manual: Description and Operation - A Clutch
Overview Item Description 1 SSA 2 A clutch control valve 3 A clutch latch valve 4 A clutch apply circuit 5 A clutch piston 6 A clutch assembly 7 Ring gear No...
Ford Explorer 2020-2025 Service Manual: Removal and Installation - Front Bumper Cover
Special Tool(s) / General Equipment Interior Trim Remover Removal NOTE: Removal steps in this procedure may contain installation details. Remove the front wheels and tires. Refer to: Wheel and Tire (204-04A Wheels and Tires, Removal and Installation)...
Categories
- Manuals Home
- 6th Generation Explorer Owners Manual
- 6th Generation Explorer Service Manual
- Removal and Installation - Liftgate Trim Panel
- Diagnosis and Testing - Parking Brake - Vehicles With: Electric Brake Booster
- Traction Control
- New on site
- Most important about car
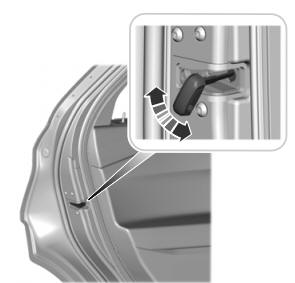
Child Safety Locks
When these locks are set, you cannot open the rear doors from the inside.

A child safety lock is on the rear edge of each rear door. You must set the child safety lock separately on each door.
Left-Hand Side
Copyright © 2025 www.foexplorer.com
