Ford Explorer: Roof Opening Panel / Removal and Installation - Roof Opening Panel Shield
Special Tool(s) / General Equipment
| Interior Trim Remover |
Removal
NOTE: Removal steps in this procedure may contain installation details.
-
Refer to: Roof Opening Panel Fixed Glass (501-17 Roof Opening Panel, Removal and Installation).
-
Refer to: Roof Opening Panel Frame (501-17 Roof Opening Panel, Removal and Installation).
-
-
NOTE: Pay attention to the position of the clip in relation to the sewn threads of the fabric and to the guide rail for reference to install.
Both sides.
Use the General Equipment: Interior Trim Remover
-
Both sides.
-
NOTE: Count the number of turns when rolling the fabric front beam from the clips for reference to install (typically 2 folds).
Both sides together.
-
.jpg) |
-
NOTE: Lift only enough to fully release the retaining ball from the frame.
.jpg) |
-
NOTE: Preform steps 1 and 2 together. Do not allow the shaft to pull out of the frame bracket until fully removing the shield in step 3.
-
NOTE: The shield/shaft tension locking action can be felt while performing steps 1 and 2.
Hold the shaft in the frame bracket.
-
Gently twist and pull the assembly until the internal shield/shaft tension lock clicks into position.
-
NOTE: If the shield is to be reused, do not allow the shaft to be pushed into the assembly or pretension will be lost.
-
.jpg) |
Installation
-
NOTE: A new shield assembly is pretensioned. After inserting the slotted end of the shield assembly into the slotted bracket of the frame, rotate the assembly (slotted bracket will keep the shaft from turning) until the tension releases.
To install, reverse the removal procedure.
 Removal and Installation - Roof Opening Panel Motor
Removal
NOTE:
Removal steps in this procedure may contain installation details.
Lower the headliner.
Refer to: Headliner - Lowering (501-05 Interior Trim and Ornamentation, Removal and ..
 Removal and Installation - Trough Assembly
Removal
NOTE:
Removal steps in this procedure may contain installation details.
Remove the roof opening panel glass.
Refer to: Roof Opening Panel Glass (501-17 Roof Opening Panel, Remov..
Other information:
Ford Explorer 2020-2025 Service Manual: General Procedures - Elevation System Check
Check Turn the ignition ON, engine OFF. Set the parking brake. Place the gearshift in REVERSE (R) for rear parking aid sensors. Place the gearshift in DRIVE (D) for front parking aid sensors...
Ford Explorer 2020-2025 Owners Manual: Declaration of Conformity
Your vehicle could have components that transmit and receive radio waves and are therefore subject to government regulation. These components must accept any interference received, including interference that could cause undesired operation. For certification labels and declarations of conformity, visit www...
Categories
- Manuals Home
- 6th Generation Explorer Owners Manual
- 6th Generation Explorer Service Manual
- Engine
- Removal and Installation - Liftgate Trim Panel
- Using Tether Straps
- New on site
- Most important about car
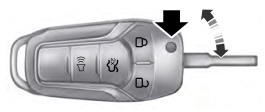
Integrated Keyhead Transmitter (If Equipped)
Use the key blade to start your vehicle and unlock or lock the driver door from outside your vehicle. The integrated keyhead transmitter functions as a programmed ignition key that operates all the locks and starts your vehicle, as well as a remote control.

