Ford Explorer: Automatic Transmission - 10-Speed Automatic Transmission – 10R60 / General Procedures - Transmission Strategy Download
Ford Explorer 2020-2025 Service Manual / Powertrain / Automatic Transmission / Automatic Transmission - 10-Speed Automatic Transmission – 10R60 / General Procedures - Transmission Strategy Download
Programming
-
This procedure should be performed when a new
transmission or main control valve body is installed in the vehicle.
-
13 - digit solenoid body strategy
-
12 - digit solenoid body identification
-
If a new main control was installed, record the
13-digit solenoid body strategy from the replacement solenoid body tag
provided with the main control service kit. Place the replacement tag
over the existing identification tag.
-
If a new transmission was installed, record the
13-digit solenoid body strategy from the solenoid body service
information tag on the side of the transmission.
-
13 - digit solenoid body strategy
.jpg) |
-
Using the scan tool, Select Toolbox and download the PCM – Transmission Strategy Download tool.
-
Run the PCM
– Transmission Strategy Download tool. Follow the instructions
displayed on the scan tool. There are fields to enter the solenoid body
12-digit identification and 13-digit strategy recorded from the solenoid
body
-
Enter the solenoid body 13-digit strategy. The scan tool
verifies the numbers entered are valid and displays a message if the
information is not valid.
-
Follow the instructions displayed on the scan tool to program the transmission strategy file into the PCM.
-
IPTV Free Trial
NOTICE: If a drive cycle is not completed, erratic shifts and driveability concerns may occur.
Road test the vehicle following the Adaptive Learning Drive Cycle.
Refer to: Adaptive Learning Drive Cycle (307-01C Automatic Transmission - 10-Speed Automatic Transmission – 10R80 MHT, General Procedures).
 General Procedures - Transmission Line Pressure Test
Materials
Name
Specification
Motorcraft® MERCON® ULV Automatic Transmission FluidXT-12-QULV
WSS-M2C949-A, MERCON® ULV
Check
With the vehicle in NEUTRAL, position i..
 Removal and Installation - E Clutch
Special Tool(s) /
General Equipment
100-002
(TOOL-4201-C)
Holding Fixture with Dial Indicator Gauge
205-1018Installation Tube
307-003
(T57L-500-B)
Holding Fixture, Transmissio..
Other information:
Ford Explorer 2020-2025 Service Manual: General Procedures - Hood Alignment
Adjustment NOTE: Removal steps in this procedure may contain installation details. All alignments Remove the hood latch. Refer to: Hood Latch (501-14 Handles, Locks, Latches and Entry Systems, Removal and Installation). Remove the nuts and the striker assembly...
Ford Explorer 2020-2025 Service Manual: Removal and Installation - Brake Caliper Anchor Plate
Removal NOTE: Removal steps in this procedure may contain installation details. Remove the brake pads. Refer to: Brake Pads (206-04 Rear Disc Brake, Removal and Installation). Remove the bolts and the anchor plate. Discard the bolts Torque: 122 lb...
Categories
- Manuals Home
- 6th Generation Explorer Owners Manual
- 6th Generation Explorer Service Manual
- Description and Operation - Identification Codes
- Removal and Installation - Front Halfshaft Speed Sensor
- Body and Paint
- New on site
- Most important about car
Child Safety Locks
When these locks are set, you cannot open the rear doors from the inside.
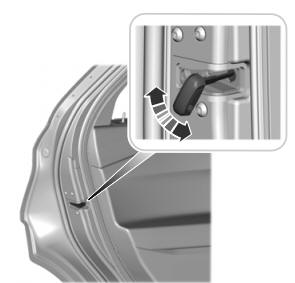
A child safety lock is on the rear edge of each rear door. You must set the child safety lock separately on each door.
Left-Hand Side
Copyright © 2025 www.foexplorer.com