Ford Explorer: Automatic Transmission - 10-Speed Automatic Transmission – 10R60 / General Procedures - Transmission Line Pressure Test
Ford Explorer 2020-2025 Service Manual / Powertrain / Automatic Transmission / Automatic Transmission - 10-Speed Automatic Transmission – 10R60 / General Procedures - Transmission Line Pressure Test
Materials
| Name | Specification |
|---|---|
| Motorcraft® MERCON® ULV Automatic Transmission Fluid XT-12-QULV |
WSS-M2C949-A, MERCON® ULV |
Check
-
With the vehicle in NEUTRAL, position it on a hoist.
Refer to: Jacking and Lifting - Overview (100-02 Jacking and Lifting, Description and Operation).
-
NOTE: If equipped.
Remove the bolt.
.jpg) |
-
Remove the bolt, nuts and position aside the transmission fluid cooler.
.jpg) |
-
Remove the line pressure plug.
.jpg) |
-
Inspect the transmission fluid cooler O-ring seals and
install new O-ring seals if necessary. Lubricate the O-ring seals.
Material: Motorcraft® MERCON® ULV Automatic Transmission Fluid / XT-12-QULV (WSS-M2C949-A, ) (MERCON® ULV)
.jpg) |
-
Install the transmission fluid cooler and loosley install the bolt and nuts.
.jpg) |
-
NOTICE: The line pressure tap is an M10 X 1.00 thread. Do not use a National Pipe Thread (NPT) fitting when installing a pressure gauge. If a NPT fitting is used, damage to the transmission case will occur.
-
Connect a Transmission Fluid Pressure Gauge with a M10 X 1.00 fitting.
-
Start the engine and check the line pressures. Refer
to the Line Pressure Chart to determine if the line pressure is within
specification.
Refer to: Special Testing Procedures (307-01A Automatic Transmission - 10-Speed Automatic Transmission – 10R60, Diagnosis and Testing).
-
Connect a Transmission Fluid Pressure Gauge with a M10 X 1.00 fitting.
-
Remove the bolt, nuts and position aside the transmission fluid cooler.
|
-
Remove the Transmission Fluid Pressure Gauge and install the line pressure plug.
Torque: 97 lb.in (11 Nm)
|
-
NOTICE: Make sure the oil cooler is completely installed against the transmission before tightening, or damage to the cooler could result.
Install the transmission fluid cooler and loosely install the bolt and the nuts by hand.
|
-
NOTICE: Make sure the oil cooler is completely installed against the transmission before tightening, or damage to the cooler could result.
Tighten the bolt and nuts in the sequence shown.
Torque: 18 lb.ft (25 Nm)
.jpg) |
-
NOTE: If equipped.
Install the bolt.
Torque: 18 lb.ft (25 Nm)
|
 General Procedures - Transmission Fluid Level Check
Check
NOTICE:
The vehicle should not be driven if the transmission fluid level is low. Internal failure could result.
NOTE:
If the vehicle has been operated for an extended period at
high hi..
 General Procedures - Transmission Strategy Download
Programming
This procedure should be performed when a new
transmission or main control valve body is installed in the vehicle.
13 - digit solenoid body strategy
12 - digit sol..
Other information:
Ford Explorer 2020-2025 Service Manual: Diagnosis and Testing - D Clutch
Symptom Chart D Clutch For D clutch operation, REFER to: D Clutch (307-01A Automatic Transmission - 10-Speed Automatic Transmission – 10R60, Description and Operation). D Clutch Condition Possible Sources Action D clutch does not apply SSD mechanically stuck OFF INSTALL a new solenoid...
Ford Explorer 2020-2025 Service Manual: Removal and Installation - AM/FM1 Antenna Amplifier
Special Tool(s) / General Equipment Interior Trim Remover Removal NOTE: Removal steps in this procedure may contain installation details. Release the clips and remove the liftgate center upper trim panel. Use the General Equipment: Interior Trim Remover Disconnect the connectors, remove the screw and the AM/FM1 antenna amplifier...
Categories
- Manuals Home
- 6th Generation Explorer Owners Manual
- 6th Generation Explorer Service Manual
- Using Tether Straps
- Body and Paint
- Traction Control
- New on site
- Most important about car
Gauges
4 Inch Display
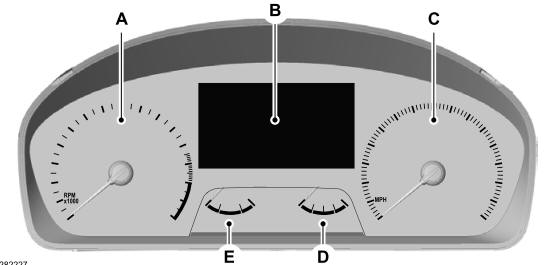
A - Tachometer.
B - Information display.
C - Speedometer.
D - Fuel gauge.
E - Engine coolant temperature gauge.
Copyright © 2025 www.foexplorer.com