Ford Explorer: Interior Trim and Ornamentation / Removal and Installation - A-Pillar Trim Panel
Ford Explorer 2020-2025 Service Manual / Body and Paint / Body and Paint / Interior Trim and Ornamentation / Removal and Installation - A-Pillar Trim Panel
Special Tool(s) / General Equipment
| Interior Trim Remover |
Removal
NOTE: LH (left hand) shown, RH (right hand) similar.
-
Disconnect the tether clips from the A-pillar trim panel.
-
Release the A-pillar trim panel clip from the tether clips.
-
Rotate the tether clip lines to align ends with opening.
-
Slide the tether clip ends out of the A-pillar trim panel.
-
Release the A-pillar trim panel clip from the tether clips.
.jpg) |
-
Lift upward and backward and remove the A-pillar trim panel.
.jpg) |
-
Remove the A-pillar tether clips from the bracket.
-
Release the front tabs.
Use the General Equipment: Interior Trim Remover
-
Rotate the front of the A-pillar tether clip downward.
-
Release the A-pillar tether clip rear tabs.
Use the General Equipment: Interior Trim Remover
-
Rotate the rear of the A-pillar tether clip downward.
-
Release the front tabs.
.jpg) |
Installation
-
Install the A-pillar tether clips onto the A-pillar trim panel.
-
Install the A-pillar trim panel clip from the tether clips.
-
Install that A-pillar tether clips into the A-pillar bracket.
-
Slide the tether clip ends into the A-pillar trim panel.
-
Install the A-pillar trim panel clip from the tether clips.
.jpg) |
-
Install the A-pillar trim panel.
-
Install the A-pillar tabs into the instrument panel.
-
Install the A-pillar tether clips into the A-pillar bracket.
-
Install the A-pillar tabs into the instrument panel.
.jpg) |
-
Inspect and position the front door weather strip lip so that it overlaps the top of the A-pillar trim panel.
.jpg) |

 Removal and Installation - A-Pillar Trim Panel - Police
Special Tool(s) /
General Equipment
Interior Trim Remover
Removal
NOTE:
LH (left hand) shown, RH (right hand) similar.
Release the wedge nut...
Other information:
Ford Explorer 2020-2025 Owners Manual: Fuel Shutoff
WARNING: If your vehicle has been involved in a crash, have the fuel system checked. Failure to follow this instruction could result in fire, personal injury or death. Note: When you try to restart your vehicle after a fuel shutoff, the vehicle makes sure that various systems are safe to restart...
Ford Explorer 2020-2025 Service Manual: Diagnosis and Testing - Diagnosis By Symptom
Symptom Chart: Automatic Transmission Diagnostics in this manual assume a certain skill level and knowledge of Ford-specific diagnostic practices. REFER to: Diagnostic Methods (100-00 General Information, Description and Operation). In most circumstances the PCM/ TCM sets a DTC to help guide with diagnostics...
Categories
- Manuals Home
- 6th Generation Explorer Owners Manual
- 6th Generation Explorer Service Manual
- Fuel Filler Funnel Location & Running Out of Fuel
- Electric Parking Brake
- Description and Operation - Jacking and Lifting - Overview
- New on site
- Most important about car
Gauges
4 Inch Display
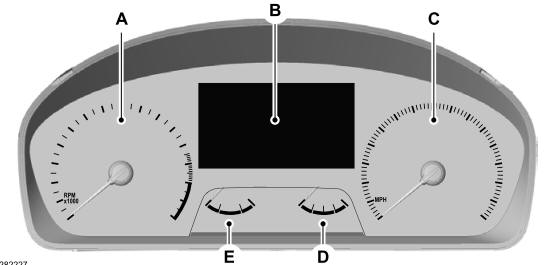
A - Tachometer.
B - Information display.
C - Speedometer.
D - Fuel gauge.
E - Engine coolant temperature gauge.
Copyright © 2025 www.foexplorer.com