Ford Explorer: Interior Trim and Ornamentation / Removal and Installation - A-Pillar Trim Panel - Police
Ford Explorer 2020-2025 Service Manual / Body and Paint / Body and Paint / Interior Trim and Ornamentation / Removal and Installation - A-Pillar Trim Panel - Police
Special Tool(s) / General Equipment
| Interior Trim Remover |
Removal
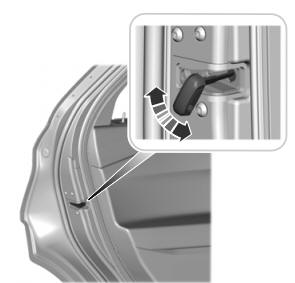
NOTE: LH (left hand) shown, RH (right hand) similar.
-
Release the wedge nut.
-
Loosen the bolt 6 turns.
-
Push the bolt in to release the wedge nut.
-
Loosen the bolt 6 turns.
.jpg) |
-
Remove the bolt.
.jpg) |
-
Position the spotlamp handle aside.
-
Remove the wedge nut.
-
Position the spotlamp handle aside.
-
Remove the wedge nut.
.jpg) |
-
Disconnect the tether clips from the A-pillar trim panel.
-
Release the A-pillar trim panel clip from the tether clip.
-
Rotate the tether clip lines to align ends with opening.
-
Slide the tether clip out of the A-pillar trim panel.
-
Release the A-pillar trim panel clip from the tether clip.
.jpg) |
-
Remove the A-pillar trim panel.
-
Disconnect the spotlamp electrical connector.
-
Remove the spotlamp handle and cover.
-
Lift upward and backward and slide the A-pillar trim panel off the spotlamp shaft.
-
Disconnect the spotlamp electrical connector.
.jpg) |
-
Remove the A-pillar tether clips from the bracket.
-
Release the front tabs.
Use the General Equipment: Interior Trim Remover
-
Rotate the front of the A-pillar tether clip downward.
-
Release the A-pillar tether clip rear tabs.
Use the General Equipment: Interior Trim Remover
-
Rotate the rear of the A-pillar tether clip downward.
-
Release the front tabs.
.jpg) |
Installation
-
Install the A-pillar tether clips onto the A-pillar trim panel.
-
Install the A-pillar trim panel clip from the tether clips.
-
Install that A-pillar tether clips into the A-pillar bracket.
-
Slide the tether clip ends into the A-pillar trim panel.
-
Install the A-pillar trim panel clip from the tether clips.
.jpg) |
-
Install the A-pillar trim panel.
-
Install the spotlamp handle and cover.
-
Connect the spotlamp electrical connector.
-
Install the A-pillar tabs into the instrument panel.
-
Install the A-pillar tether clips into the A-pillar bracket.
-
Install the spotlamp handle and cover.
.jpg) |
-
Install the spotlamp handle.
-
Install the spotlamp handle.
-
NOTE: To install, make sure the wedge nut aligns with the keyway on the spotlamp shaft.
Install the wedge nut.
-
Install the spotlamp handle.
.jpg) |
-
Install the bolt.
Torque: 62 lb.in (7 Nm)
|
-
Inspect and position the front door weather strip lip so that it overlaps the top of the A-pillar trim panel.
.jpg) |
 Removal and Installation - A-Pillar Trim Panel
Special Tool(s) /
General Equipment
Interior Trim Remover
Removal
NOTE:
LH (left hand) shown, RH (right hand) similar.
Disconnect the tether clips from the A-pillar trim pa..
 Removal and Installation - B-Pillar Trim Panel
Special Tool(s) /
General Equipment
Interior Trim Remover
Removal
NOTE:
LH (left hand) shown, RH (right hand) similar.
Upper and lower B-pillar trim panels
Remove the follow..
Other information:
Ford Explorer 2020-2025 Service Manual: Removal and Installation - Power Fold Seat Module [SCMJ]
Removal NOTE: Removal steps in this procedure may contain installation details. NOTE: The SCMJ (power fold seat module) is located under the LH (left-hand) second row seat cushion frame. NOTE: This step is only necessary when installing a new component...
Ford Explorer 2020-2025 Service Manual: Removal and Installation - Alternating Current (AC) Power Outlet Socket
Special Tool(s) / General Equipment Interior Trim Remover Removal WARNING: Disconnect the 12 volt battery before servicing the direct current to alternating current (DC-AC) inverter or alternating current (AC) powerpoint to prevent the risk of high voltage shock...
Categories
- Manuals Home
- 6th Generation Explorer Owners Manual
- 6th Generation Explorer Service Manual
- Engine
- Using Tether Straps
- Interior Trim and Ornamentation
- New on site
- Most important about car
Child Safety Locks
When these locks are set, you cannot open the rear doors from the inside.
A child safety lock is on the rear edge of each rear door. You must set the child safety lock separately on each door.
Left-Hand Side
Copyright © 2025 www.foexplorer.com