Ford Explorer: Front Seats / Removal and Installation - Front Seat Backrest Cover
Removal
.jpg) WARNING:
Front seat backrest trim covers installed on seats equipped
with seat side airbags cannot be repaired. A new trim cover must be
installed. Cleaning is permissible. Failure to follow these instructions
may result in the seat side airbag deploying incorrectly and increase
the risk of serious personal injury or death in a crash.
WARNING:
Front seat backrest trim covers installed on seats equipped
with seat side airbags cannot be repaired. A new trim cover must be
installed. Cleaning is permissible. Failure to follow these instructions
may result in the seat side airbag deploying incorrectly and increase
the risk of serious personal injury or death in a crash.
NOTE: Removal steps in this procedure may contain installation details.
NOTE: Driver seat shown, all other seats similar.
All seats
-
Remove the side airbag.
Refer to: Side Airbag (501-20B Supplemental Restraint System, Removal and Installation).
-
Remove the head restraint guide sleeves.
Refer to: Front Head Restraint Guide Sleeve (501-10A Front Seats, Removal and Installation).
-
Detach the front seat backrest cover J-clip and position upwards.
.jpg) |
-
If equipped with heated/ventilated seats.
Remove the front seat backrest blower motor.
Refer to: Front Seat Backrest Blower Motor (501-10A Front Seats, Removal and Installation).
-
-
If equipped with power lumbar.
Disconnect the front seat power lumbar assembly electrical connector.
-
If equipped with heated seat.
Detach and disconnect the front seat backrest heater mat electrical connector.
-
If equipped with power lumbar.
.jpg) |
Multi-contour seat
-
Remove the SCMG or SCMH.
Refer to: Driver Multi-Contour Seat Module [SCMG] (501-10A Front Seats, Removal and Installation).
-
-
Disconnect the front seat power lumbar assembly electrical connector.
-
Detach and disconnect the front seat backrest heater mat electrical connector.
-
Disconnect the front seat power lumbar assembly electrical connector.
.jpg) |
All seats
-
Remove the screws.
.jpg) |
-
-
Feed the side airbag electrical connector through the front seat backrest frame.
-
Position the front seat backrest trim down.
-
Remove the front seat backrest cover assembly bolt.
Torque: 62 lb.in (7 Nm)
-
Feed the side airbag electrical connector through the front seat backrest frame.
.jpg) |
-
-
Position the front seat backrest trim down.
-
Remove the front seat backrest cover assembly bolts.
Torque: 62 lb.in (7 Nm)
-
Position the front seat backrest trim down.
.jpg) |
-
Remove the front seat backrest cover assembly.
- Pull the lower backrest cover assembly out while noting the location of the guide pin for installation.
-
Lift the upper backrest cover assembly over the backrest frame.
.jpg) |
-
Detach the front seat backrest cover retainer and J-clips.
.jpg) |
-
If equipped with heated/ventilated seats.
Detach the front seat backrest carrier from the vent bag.
-
Release the tabs.
-
Detach the front seat backrest carrier from the vent bag.
-
Release the tabs.
.jpg) |
-
Position the front seat backrest cover aside and remove the backrest cover carrier.
.jpg) |
-
NOTICE: Use care when separating the backrest cover from the hook-and-arrows, or the hooks can be torn from the backrest foam.
NOTICE: Use care when separating the seat backrest trim cover from the hook-and-loop strips or the hook-and-loop strips may be torn from the seat backrest foam.
NOTE: Base front seat shown, all others similar.
Remove the front seat backrest cover.
-
Invert the backrest cover.
-
Release the hook-and-arrows.
-
Release the hook-and-loop strip.
-
Invert the backrest cover.
.jpg) |
Installation
-
To install, reverse the removal procedure.
 Removal and Installation - Front Seat Backrest Blower Motor
Special Tool(s) /
General Equipment
Interior Trim Remover
Removal
NOTE:
Driver seat shown, passenger seat similar.
Remove the front seat...
 Removal and Installation - Front Seat Control Switch
Removal
NOTE:
Driver seat control switch shown, all others similar.
Remove the front seat.
Refer to: Front Seat (501-10A Front Seats, Removal and Installation)...
Other information:
Ford Explorer 2020-2025 Service Manual: Removal and Installation - Thermostat
Removal NOTE: Removal steps in this procedure may contain installation details. Drain the cooling system. Refer to: Engine Cooling System Draining, Vacuum Filling and Bleeding (303-03A Engine Cooling - 2.3L EcoBoost (201kW/273PS), General Procedures)...
Ford Explorer 2020-2025 Service Manual: Removal and Installation - Wiper Linkage Assembly
Removal NOTE: Removal steps in this procedure may contain installation details. NOTE: The hood is removed in this procedure for clarity. Remove the cowl panel grille. Refer to: Cowl Panel Grille (501-02 Front End Body Panels, Removal and Installation)...
Categories
- Manuals Home
- 6th Generation Explorer Owners Manual
- 6th Generation Explorer Service Manual
- General Procedures - Brake Service Mode Activation and Deactivation
- General Procedures - Rear Camber Adjustment
- Description and Operation - Identification Codes
- New on site
- Most important about car
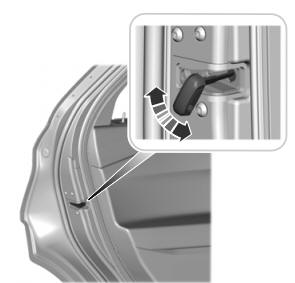
Child Safety Locks
When these locks are set, you cannot open the rear doors from the inside.

A child safety lock is on the rear edge of each rear door. You must set the child safety lock separately on each door.
Left-Hand Side
