Ford Explorer: Interior Trim and Ornamentation / Removal and Installation - Headliner - Lowering
Special Tool(s) /
General Equipment
| Pick Hook |
| Interior Trim Remover |
-
Remove the following items:
-
On both sides.
Remove the A-pillar trim panel.
Refer to: A-Pillar Trim Panel (501-05 Interior Trim and Ornamentation, Removal and Installation).
Refer to: A-Pillar Trim Panel - Police (501-05 Interior Trim and Ornamentation, Removal and Installation).
-
On both sides.
Remove the upper B-pillar trim panel.
Refer to: B-Pillar Trim Panel (501-05 Interior Trim and Ornamentation, Removal and Installation).
-
On both the sides.
Remove the C-pillar trim panel.
Refer to: C-Pillar Trim Panel (501-05 Interior Trim and Ornamentation, Removal and Installation).
-
On LH side.
Position the headliner wiring harness aside.
-
Disconnect the headliner wiring harness electrical connectors.
-
Release the headliner wiring harness retainers.
Use the General Equipment: Interior Trim Remover
-
On RH side.
Position the headliner wiring harness aside.
-
Disconnect the headliner wiring harness electrical connector.
-
Release the headliner wiring harness retainers.
Use the General Equipment: Interior Trim Remover
-
On RH side.
Position the rear wiper washer hose aside.
-
Release the rear wiper washer hose retainer.
Use the General Equipment: Pick Hook
-
Disconnect the rear wiper washer hose coupling.
Refer to: Washer Hose Coupling (501-16 Wipers and Washers, General Procedures).
-
Release the rear wiper washer hose from the A-pillar.
-
https://magicaliptv.com/iptv-free-trials/
NOTE:
Interior rear view mirror removed for clarity.
If equipped.
Release the clips and remove the interior rear view mirror cover.
-
NOTE:
Interior rear view mirror removed for clarity.
If equipped.
Disconnect the headliner wiring harness electrical connectors.
-
Disconnect the humidity and temperature sensor electrical connector.
-
Disconnect the rain sensor electrical connector.
-
Disconnect the front vision camera electrical connector.
-
Disconnect the interior rear view mirror electrical connector.
-
Disconnect the heated windshield grid electrical connector.
-
NOTE:
LH (left hand) shown, RH (right hand) similar.
On both sides.
Remove the sun visor.
-
Position the sun visor screw cover aside.
-
Remove the sun visor screw.
-
Rotate the sun visor assembly down.
-
If equipped.
Disconnect the sun visor electrical connector.
-
NOTE:
LH (left hand) shown, RH (right hand) similar.
On both sides.
Remove the screw and the sun visor clip.
-
On RH side.
Remove the front assist handle.
-
Position the front assist handle down.
-
Remove the front assist handle retainers.
Use the General Equipment: Pick Hook
-
NOTE:
LH (left hand) shown, RH (right hand) similar.
On both sides.
Remove the rear garment hook.
-
Position the rear garment hook screw cover aside.
Use the General Equipment: Pick Hook
-
Remove the rear garment hook screw.
-
On RH side.
Disconnect the rear wiper washer hose coupling.
Refer to: Washer Hose Coupling (501-16 Wipers and Washers, General Procedures).
-
On both sides.
Position the front seat backrest in the fully reclined position.
-
On both sides.
Position the second row seat backrest in the fold flat position.
-
If equipped.
Position the third row seat backrests in the fold flat position.
-
NOTE:
Seats removed for clarity.
Release the rear clips and lower the headliner.
Use the General Equipment: Interior Trim Remover
Special Tool(s) /
General Equipment
Pick Hook
Interior Trim Remover
Materials
Name
Specification
3M™ Super-Fast Repair Adhesive04747
-
Removal
Remove the..
Special Tool(s) /
General Equipment
Interior Trim Remover
Removal
Release the clips and remove the liftgate center upper trim panel...
Other information:
Removal
NOTICE:
Fuel injection equipment is manufactured to very precise
tolerances and fine clearances. To prevent fuel system damage, it is
essential that absolute cleanliness is observed when working with these
components.
NOTICE:
Do not loosen any fittings or plugs on the high-pressure fuel pump...
System Operation
System Diagram - Gauges
Gas
Item
Description
1
IPC
2
GWM
3
PCM
4
Fuel pump and sender unit
5
Base/mid-level analog gauges
6
Mid-level virtual gauges
7
AWD
8
High-level virtual gauges
9
AWD
10
AWD
11
Base level virtual gauge
12
Temperature
13
Fuel
14
S..
Categories
 Push the lever up or down to operate
the windshield wipers.
Push the lever up or down to operate
the windshield wipers.
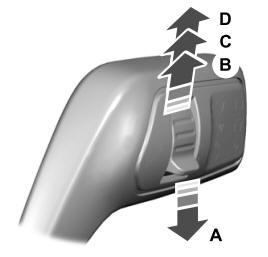
A - Single wipe.
read more
.jpg)
.jpg)
.jpg)
.jpg)
.jpg)
.jpg)
.jpg)
.jpg)
.jpg)
.jpg)
.jpg)
.jpg)
.jpg)
.jpg)
 Removal and Installation - Headliner
 Removal and Installation - Liftgate Trim Panel