Ford Explorer: Handles, Locks, Latches and Entry Systems / Removal and Installation - Hood Latch Release Cable
Removal
Front Cable
-
Remove the hood latch.
Refer to: Hood Latch (501-14 Handles, Locks, Latches and Entry Systems, Removal and Installation).
-
NOTE:
This step is only necessary when installing a new component.
Disconnect the hood latch release cable from the hood latch.
-
Detach the cable from the mounting bracket.
-
Disconnect the hood latch release cable end.
IPTV Free Trial Rear Cable
-
On LH side.
Remove the front scuff plate trim panel.
Refer to: Front Scuff Plate Trim Panel (501-05 Interior Trim and Ornamentation, Removal and Installation).
-
Remove the hood latch release and disconnect the rear hood latch release cable.
-
Remove the bolts.
-
Release the rear hood latch release cable from the mounting bracket.
-
Disconnect the rear hood latch release cable eyelet and remove the hood latch release.
-
Route the rear hood latch release cable through the cowl.
-
Remove the cowl access panel.
-
Remove the BJB cover.
-
NOTE:
The BJB shown removed for clarity.
Route the rear hood latch release cable through the engine compartment.
-
Route the rear hood latch release cable grommet through the cowl.
-
Route the rear hood latch release cable through the engine compartment.
-
Route the rear hood latch release cable through the engine compartment.
-
Open the hood latch release cable junction block cover.
-
Release the clips on the hood latch release cable junction block cover.
-
Open the hood latch release cable junction block cover.
-
Remove the rear hood latch release cable.
-
Detach the cable from the mounting bracket.
-
Disconnect the rear hood latch release cable end and position the rear hood latch cable aside.
-
Remove the rear hood latch release cable.
Installation
Rear Cable
-
NOTE:
This step is only necessary if reusing the original hood latch release cable.
Install the hood latch release and connect the rear hood latch release cable.
-
Connect the rear hood latch release cable eyelet.
-
Attach the rear hood latch release cable to the mounting bracket.
-
Install the bolts.
Torque:
80 lb.in (9 Nm)
-
Route the rear hood latch release cable through the cowl.
-
NOTE:
The BJB shown removed for clarity.
Route the rear hood latch release cable through the engine compartment.
-
Route the rear hood latch release cable grommet through the cowl.
-
Route the rear hood latch release cable through the engine compartment.
-
Route the rear hood latch release cable through the engine compartment.
-
Route and connect the rear hood latch release cable.
-
Route the rear hood latch release cable.
-
Connect the rear hood latch release cable end to the hood latch release cable junction block.
-
Attach the cable to the mounting bracket.
-
Close the hood latch release cable junction block cover.
-
Close the hood latch release cable junction block cover.
-
Secure the clips on the hood latch release cable junction block cover.
-
Install the BJB cover.
-
Install the cowl access panel.
-
On LH side.
Install the front scuff plate trim panel.
Refer to: Front Scuff Plate Trim Panel (501-05 Interior Trim and Ornamentation, Removal and Installation).
Front Cable
-
NOTE:
This step is only necessary when installing a new component.
Connect the hood latch release cable to the hood latch.
-
Connect the hood latch release cable end.
-
Attach the cable to the mounting bracket.
-
Install the hood latch.
Refer to: Hood Latch (501-14 Handles, Locks, Latches and Entry Systems, Removal and Installation).
Removal
NOTE:
Removal steps in this procedure may contain installation details.
Position aside the hood latch release cable junction block cover...
Removal
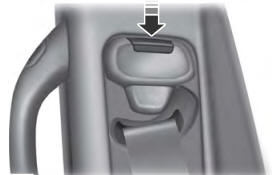
Remove the hood latch release handle.
Rotate the hood latch release handle.
NOTE:
Do not remove the retaining clip from the hood latch release handle...
Other information:
This device complies with Part 15 of the FCC Rules and with Industry Canada license-exempt
RSS standard(s). Operation is subject to the following two conditions: (1) This
device may not cause harmful interference, and (2) This device must accept any interference
received, including interference that may cause undesired operation...
WARNING: You are responsible for controlling your vehicle at all times.
The system is designed to be an aid and does not relieve you of your responsibility
to drive with due care and attention. Failure to follow this instruction could result
in the loss of control of your vehicle, personal injury or death...
Categories
WARNING: Position the seatbelt height adjuster so that the seatbelt rests
across the middle of your shoulder. Failure to adjust the seatbelt correctly could
reduce its effectiveness and increase the risk of injury in a crash.
read more
.jpg)
.jpg)
.jpg)
.jpg)
.jpg)
.jpg)
.jpg)
.jpg)
.jpg)
.jpg)
.jpg)
.jpg)
.jpg)
.jpg)
.jpg)
.jpg)
 Removal and Installation - Hood Latch
 Removal and Installation - Hood Latch Release Handle