Ford Explorer: Handles, Locks, Latches and Entry Systems / Removal and Installation - Hood Latch
Ford Explorer 2020-2026 Service Manual / Body and Paint / Body and Paint / Handles, Locks, Latches and Entry Systems / Removal and Installation - Hood Latch
Removal
NOTE: Removal steps in this procedure may contain installation details.
-
Position aside the hood latch release cable junction block cover.
-
Release the retaining tabs on the hood latch release cable junction block cover.
-
Position aside the hood latch release cable junction block cover.
-
Release the retaining tabs on the hood latch release cable junction block cover.
.jpg) |
-
Detach and position the rear hood latch release cables aside.
-
Detach the cable from the mounting bracket.
-
Disconnect the hood latch release cable end and position the rear hood latch cable aside.
-
Detach the hood latch release cable junction block
and position the front hood latch cable and junction block assembly
aside.
-
Detach the cable from the mounting bracket.
.jpg) |
-
well контроль
NOTE: If reinstalling the original hood latch, mark around the bolts to aid in alignment during installation.
Remove the hood latch.
-
Remove the bolts.
Torque: 80 lb.in (9 Nm)
-
Remove the hood latch.
-
If equipped.
Disconnect the hood ajar switch.
-
Remove the bolts.
.jpg) |
-
NOTE: This step is only necessary when installing a new component.
Disconnect the hood latch release cable from the hood latch.
-
Detach the cable from the mounting bracket.
-
Disconnect the hood latch release cable end.
-
Detach the cable from the mounting bracket.
.jpg) |
Installation
-
To install, reverse the removal procedure.
-
NOTE: If reinstalling the original hood latch, use the marks made during removal to aid in alignment.
Install the bolts and align the hood latch.
-
Align the hood latch.
-
Tighten the hood latch bolts.
Torque: 80 lb.in (9 Nm)
-
Align the hood latch.
.jpg) |
 Removal and Installation - Fuel Filler Door Latch
Removal
Remove the fuel filler door assembly.
Refer to: Fuel Filler Door Assembly (501-03 Body Closures, Removal and Installation).
Remove the fuel filler door latch...
 Removal and Installation - Hood Latch Release Cable
Removal
Front Cable
Remove the hood latch.
Refer to: Hood Latch (501-14 Handles, Locks, Latches and Entry Systems, Removal and Installation)...
Other information:
Ford Explorer 2020-2026 Owners Manual: Warning Lamps and Indicators
The following warning lamps and indicators alert you to a vehicle condition that may become serious. Some lamps illuminate when you start your vehicle to make sure they work. If any lamps remain on after starting your vehicle, refer to the respective system warning lamp for further information...
Ford Explorer 2020-2026 Service Manual: General Procedures - Wire Terminal Inspection and Removal
Disconnect WARNING: Before beginning any service procedure in this section, refer to Health and Safety Precautions in section 100-00 General Information. Failure to follow this instruction may result in serious personal injury. Refer to: Health and Safety Precautions (100-00 General Information, Description and Operation)...
Categories
- Manuals Home
- 6th Generation Explorer Owners Manual
- 6th Generation Explorer Service Manual
- Description and Operation - Identification Codes
- General Procedures - Brake Service Mode Activation and Deactivation
- Auxiliary Power Points
- New on site
- Most important about car
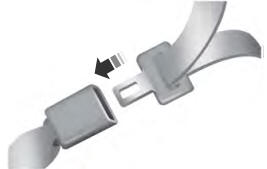
Fastening the Seatbelts
The front outboard and rear safety restraints in the vehicle are combination lap and shoulder belts.
Copyright © 2026 www.foexplorer.com