Ford Explorer: Handles, Locks, Latches and Entry Systems / Removal and Installation - Liftgate Latch - Police
Ford Explorer 2020-2025 Service Manual / Body and Paint / Body and Paint / Handles, Locks, Latches and Entry Systems / Removal and Installation - Liftgate Latch - Police
Removal
NOTE: Removal steps in this procedure may contain installation details.
-
Remove the liftgate trim panel.
Refer to: Liftgate Trim Panel (501-05 Interior Trim and Ornamentation, Removal and Installation).
-
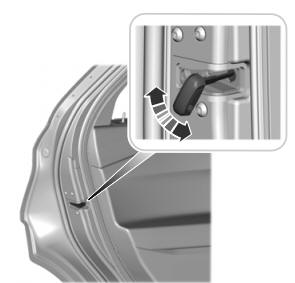
Remove the liftgate latch bolts.
Torque: 177 lb.in (20 Nm)
.jpg) |
-
https://magicaliptv.com/iptv-free-trials/
NOTE: Liftgate shown transparent for clarity.
Remove the liftgate latch.
-
Remove the liftgate lock cylinder release cable from the liftgate lock cylinder.
-
Release the liftgate lock cylinder release cable routing clips.
-
Disconnect the electrical connector.
-
Remove the liftgate latch.
-
Remove the liftgate lock cylinder release cable from the liftgate lock cylinder.
.jpg) |
Installation
-
To install, reverse the removal procedure.
 Removal and Installation - Liftgate Latch
Removal
NOTE:
Removal steps in this procedure may contain installation details.
Remove the liftgate trim panel.
Refer to: Liftgate Trim Panel (501-05 Interior Trim and Ornamentation, Re..
 Removal and Installation - Liftgate Lock Cylinder - Police
Removal
NOTE:
Repair individual liftgate lock cylinder by discarding the
inoperative liftgate lock cylinder and building a new liftgate lock
cylinder using the appropriate lock repair service kit..
Other information:
Ford Explorer 2020-2025 Service Manual: General Procedures - High Voltage System De-energizing
Depower WARNING: To prevent the risk of high-voltage shock, always follow precisely all warnings and service instructions, including instructions to depower the system. The high-voltage system utilizes approximately 450 volts DC, provided through high-voltage cables to its components and modules...
Ford Explorer 2020-2025 Service Manual: Description and Operation - Body Repair Health and Safety and General Precautions
WARNING: Always refer to Material Safety Data Sheet (MSDS) when handling chemicals and wear protective equipment as directed. Examples may include but are not limited to respirators and chemically resistant gloves. Failure to follow these instructions may result in serious personal injury...
Categories
- Manuals Home
- 6th Generation Explorer Owners Manual
- 6th Generation Explorer Service Manual
- Diagnosis and Testing - Parking Brake - Vehicles With: Electric Brake Booster
- Engine - 2.3L EcoBoost (201kW/273PS)
- Body and Paint
- New on site
- Most important about car
Child Safety Locks
When these locks are set, you cannot open the rear doors from the inside.
A child safety lock is on the rear edge of each rear door. You must set the child safety lock separately on each door.
Left-Hand Side
Copyright © 2025 www.foexplorer.com