Ford Explorer: Interior Trim and Ornamentation / Removal and Installation - Loadspace Trim Panel
Ford Explorer 2020-2025 Service Manual / Body and Paint / Body and Paint / Interior Trim and Ornamentation / Removal and Installation - Loadspace Trim Panel
Special Tool(s) / General Equipment
| Long Nose Pliers | |
| Interior Trim Remover |
Removal
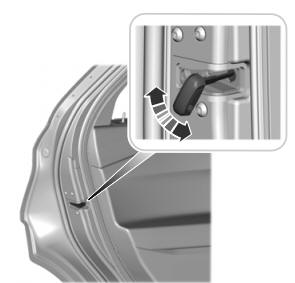
NOTE: LH (left hand) shown, RH (right hand) similar.
IPTV Free TrialNOTE: Removal steps in this procedure may contain installation details.
-
Remove the following items:
-
Remove the rear scuff plate trim panel.
Refer to: Rear Scuff Plate Trim Panel (501-05 Interior Trim and Ornamentation, Removal and Installation).
-
Remove the D-pillar trim panel.
Refer to: D-Pillar Trim Panel (501-05 Interior Trim and Ornamentation, Removal and Installation).
-
Remove the rear scuff plate trim panel.
-
NOTE: Third row seats removed for clarity.
Remove the loadspace trim panel retainer.
Use the General Equipment: Long Nose Pliers
.jpg) |
-
NOTE: Third row seats removed for clarity.
Position the cargo hook bolt covers aside.
.jpg) |
-
NOTE: Third row seats removed for clarity.
Remove the cargo hook bolts and the cargo hooks.
Torque: 44 lb.in (5 Nm)
.jpg) |
-
Position the liftgate weatherstrip aside.
.jpg) |
Left hand side
-
NOTE: Third row seats removed for clarity.
Release the clips and remove the loadspace trim panel.
Use the General Equipment: Interior Trim Remover
.jpg) |
Right hand side
-
NOTE: Third row seats removed for clarity.
Remove the loadspace trim panel.
-
Release the loadspace trim panel clips.
Use the General Equipment: Interior Trim Remover
-
Disconnect the luggage compartment interior lamp electrical connector.
-
If equipped.
Disconnect the power fold seat control switch electrical connector.
-
If equipped.
Disconnect the luggage compartment power point electrical connector.
-
Release the loadspace trim panel clips.
.jpg) |
Installation
-
To install, reverse the removal procedure.
 Removal and Installation - Liftgate Trim Panel
Special Tool(s) /
General Equipment
Interior Trim Remover
Removal
Release the clips and remove the liftgate center upper trim panel...
 Removal and Installation - Loadspace Trim Panel - Police
Special Tool(s) /
General Equipment
Interior Trim Remover
Removal
NOTE:
RH (right hand) shown, LH (left hand) similar.
Remove the D-pillar trim panel...
Other information:
Ford Explorer 2020-2025 Owners Manual: Using Voice Recognition
The system allows you to interact with the entertainment, information and communication systems on your vehicle using voice commands. This allows you to keep your hands on the steering wheel and focus on what is in front of you. Press the voice control button on the steering wheel and wait for the voice prompt...
Ford Explorer 2020-2025 Owners Manual: Changing a Bulb
WARNING: Switch the lamps and the ignition off. Failure to do so could result in serious personal injury. WARNING: Bulbs can become hot. Let the bulb cool down before removing it. Failure to do so could result in personal injury. Use the correct specification bulb...
Categories
- Manuals Home
- 6th Generation Explorer Owners Manual
- 6th Generation Explorer Service Manual
- Fuel Filler Funnel Location & Running Out of Fuel
- General Procedures - Transmission Fluid Drain and Refill
- Diagnosis and Testing - Parking Brake - Vehicles With: Electric Brake Booster
- New on site
- Most important about car
Child Safety Locks
When these locks are set, you cannot open the rear doors from the inside.
A child safety lock is on the rear edge of each rear door. You must set the child safety lock separately on each door.
Left-Hand Side
Copyright © 2025 www.foexplorer.com