Ford Explorer: Parking Brake and Actuation / Removal and Installation - Parking Brake Switch
Ford Explorer 2020-2025 Service Manual / Chassis / Brake System / Parking Brake and Actuation / Removal and Installation - Parking Brake Switch
Removal
NOTE: Removal steps in this procedure may contain installation details.
NOTE: Move the front seats forward and rearward as necessary to access floor console components.
-
Release the clips and remove the RH (right-hand) floor console side trim panel.
.jpg) |
-
Disconnect the RH floor console electrical connectors.
.jpg) |
-
Release the clips and remove the LH (left-hand) floor console side trim panel.
.jpg) |
-
Release the clips and remove the LH (left-hand) floor console side trim panel.
.jpg) |
-
Remove the bolts and position the floor console rearward.
Torque: 48 lb.in (5.4 Nm)
.jpg) |
-
Open the console door.
.jpg) |
-
Release the clips, detach the console top panel,
disconnect the electrical connectors and remove the console top panel.
.jpg) |
-
Remove the bolts and the parking brake switch.
Torque: 17 lb.in (1.9 Nm)
.jpg) |
Installation
-
To install, reverse the removal procedure.
-
NOTE: Anytime the parking brake switch electrical connector has been disconnected, the EPB system is deactivated and a DTC is stored in the EPB module. Perform the following step to restore the EPB system and clear the EPB module DTC.
Apply and release the parking brake twice within 5 seconds, pausing with the switch in the NEUTRAL position for approximately one-half second between each apply and release. Using a diagnostic scan tool, clear the EPB module Diagnostic Trouble Codes (DTCs).
 Removal and Installation - Parking Brake Actuator Motor
Removal
NOTE:
Removal steps in this procedure may contain installation details.
NOTE:
LH side shown, RH similar.
With the vehicle in NEUTRAL, position it on a hoist...

Other information:
Ford Explorer 2020-2025 Service Manual: Removal and Installation - Front Seat Cushion Cover
Removal Passenger seat Remove the OCS. Refer to: Occupant Classification System (OCS) Sensor - Vehicles Without: Multi-Contour Seats (501-20B Supplemental Restraint System, Removal and Installation). Refer to: Occupant Classification System (OCS) Sensor - Vehicles With: Multi-Contour Seats (501-20B Supplemental Restraint System, Removal and Installation)...
Ford Explorer 2020-2025 Service Manual: Description and Operation - Second Row Seats - System Operation and Component Description
System Operation System Diagram - Heated/Ventilated Seats Item Description 1 RHVAC 2 MS-CAN 3 SCMF 4 LH Second Row Seat 5 Cushion Temperature Sensor 6 RH Second Row Seat 7 Backrest Heater Mat 8 Cushion Heater Mat 9 Cushion and Backrest Blower Motors 10 Backrest Heater Mat 11 Cushion Heater Mat ..
Categories
- Manuals Home
- 6th Generation Explorer Owners Manual
- 6th Generation Explorer Service Manual
- Removal and Installation - All-Wheel Drive (AWD) Module
- General Procedures - Transmission Fluid Drain and Refill
- General Procedures - Rear Camber Adjustment
- New on site
- Most important about car
Gauges
4 Inch Display
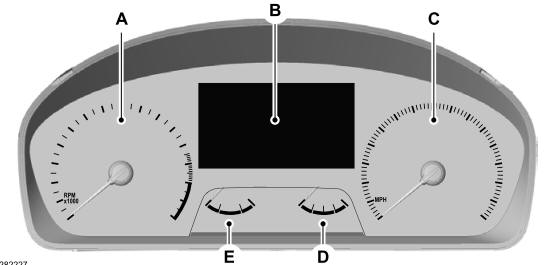
A - Tachometer.
B - Information display.
C - Speedometer.
D - Fuel gauge.
E - Engine coolant temperature gauge.
Copyright © 2025 www.foexplorer.com