Ford Explorer: Seatbelt Systems / Removal and Installation - Third Row Seatbelt Retractor
Ford Explorer 2020-2025 Service Manual / Body and Paint / Body and Paint / Seatbelt Systems / Removal and Installation - Third Row Seatbelt Retractor
Removal
NOTE: Removal steps in this procedure may contain installation details.
NOTE: LH (left-hand) shown, RH (right-hand) similar.
-
Remove the Loadspace trim panel.
Refer to: Loadspace Trim Panel (501-05 Interior Trim and Ornamentation, Removal and Installation).
-
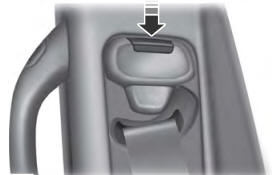
Remove the third row seatbelt retractor.
-
Remove the bolt.
Torque: 30 lb.ft (40 Nm)
-
Remove the bolt.
Torque: 30 lb.ft (40 Nm)
-
Remove the bolt.
.jpg) |
Installation
NOTE: During installation, make sure the seatbelt webbing is not twisted and the seatbelts and buckles are accessible to the occupants.
-
To install, reverse the removal procedure.
-
Check the seatbelt system for correct operation.
Refer to: Seatbelt Systems (501-20A Seatbelt Systems, Diagnosis and Testing).
 Removal and Installation - Third Row Seatbelt Buckle
Removal
NOTE:
Removal steps in this procedure may contain installation details.
NOTE:
LH (left-hand) shown, RH (right-hand) similar.
Remove the luggage compartment floor cover...
 Removal and Installation - Second Row Seatbelt Retractor and Pretensioner
Removal
WARNING:
The following procedure prescribes critical repair steps
required for correct restraint system operation during a crash. Follow
all notes and steps carefully...
Other information:
Ford Explorer 2020-2025 Owners Manual: Stay in Neutral Mode
Note: Stay in neutral mode is a temporary vehicle state that works with the engine being in the running or OFF state. Once in this mode, sufficient battery voltage must be maintained or your vehicle returns to park. If the feature is left active for extended time when engine is OFF...
Ford Explorer 2020-2025 Service Manual: General Procedures - Connecting Rod Bearing Journal Clearance
Check NOTE: Refer to the appropriate Section 303-01 for the specification. NOTE: The crankshaft connecting rod journals must be within specifications to check the connecting rod bearing journal clearance. Remove the connecting rod bearing cap and connecting rod bearing...
Categories
- Manuals Home
- 6th Generation Explorer Owners Manual
- 6th Generation Explorer Service Manual
- General Procedures - Transmission Fluid Drain and Refill
- Electric Parking Brake
- Engine - 2.3L EcoBoost (201kW/273PS)
- New on site
- Most important about car
Seatbelt Height Adjustment
WARNING: Position the seatbelt height adjuster so that the seatbelt rests across the middle of your shoulder. Failure to adjust the seatbelt correctly could reduce its effectiveness and increase the risk of injury in a crash.
Copyright © 2025 www.foexplorer.com