Ford Explorer: Climate Control System - General Information / General Procedures - Air Conditioning (A/C) Compressor Leak Detection
Ford Explorer 2020-2025 Service Manual / Electrical / Climate Control System / Climate Control System - General Information / General Procedures - Air Conditioning (A/C) Compressor Leak Detection
Special Tool(s) / General Equipment
| Air Conditioning Service Unit | |
| Electronic Leak Detector | |
| Air Conditioning Adaptor Kit |
Leak detection
-
Recover the refrigerant. Refer to Air Conditioning (A/C)
System Recovery, Evacuation and Charging procedure in Group 412.
-
Disconnect the refrigerant lines from the A/C compressor. Refer to the appropriate section in Group 412 for the procedure.
-
Install the adapters from the A/C Flush Adapter Kit on the ports of the A/C compressor, using the existing retaining bolts.
-
219-00082 ACF-3000 33PC Adapter Kit - Revised 1st released 44pc kit
-
219-00083 A/C Flushing Adapter Kit 2 of 3 (Previously "Supplement A", 2nd released kit)
-
219-00084 A/C Flushing Adapter Kit 3 of 3
Use the General Equipment: Air Conditioning Adaptor Kit
-
219-00082 ACF-3000 33PC Adapter Kit - Revised 1st released 44pc kit
-
Connect the high and low pressure lines of the air
conditioning service unit to the corresponding fittings on the adapter.
-
199-FFX1234 Flo Dynamics R1234yf A/C Refrigerant Management Center
Use the General Equipment: Air Conditioning Service Unit
-
199-FFX1234 Flo Dynamics R1234yf A/C Refrigerant Management Center
-
Charge the A/C
compressor following the air conditioning service unit instructions.
Open the low pressure valve, the high pressure valve and set the
refrigerant charge amount to 0.23 kg (8 oz).
-
NOTE: Use a Rotunda-approved Electronic Leak Detector for R-1234yf refrigerant SAE Certified to J2913.
Using the Refrigerant Leak Detector, check for leaks at the compressor shaft.
-
023‐22791 Robinair Infrared A/C Refrigerant Leak Detector w/Case
Use the General Equipment: Electronic Leak Detector
-
023‐22791 Robinair Infrared A/C Refrigerant Leak Detector w/Case
-
When the leak test is complete, recover the refrigerant from the compressor.
-
If an external leak is found, install a new A/C compressor.
 General Procedures - Air Conditioning (A/C) Clutch and Air Conditioning (A/C) Clutch Field Coil - Vehicles With: R134A Refrigerant/R1234YF Refrigerant
Special Tool(s) /
General Equipment
412-001
(T71P-19703-B)
Remover, Compressor Pulley
Activation
Remove the A/C compressor. Refer to Air Conditioning A/C Compressor procedure in ..
 General Procedures - Air Conditioning (A/C) Compressor Leak Detection - Vehicles With: R134A Refrigerant
Special Tool(s) /
General Equipment
Air Conditioning Service Unit
Electronic Leak Detector
Air Conditioning Adaptor Kit
Leak detection
Recover the refrigerant...
Other information:
Ford Explorer 2020-2025 Service Manual: Diagnosis and Testing - Wheels and Tires
Preliminary Inspection Verify the customer concern by carrying out a road test on a smooth road. If any vibrations are apparent, Refer to the Symptom Chart: NVH. To maximize tire performance, inspect for signs of incorrect inflation and uneven wear, which may indicate a need for balancing, rotation or front suspension alignment...
Ford Explorer 2020-2025 Service Manual: Description and Operation - Parking Aid - Overview
Parking Aid Overview Parking Aid - Audible The available parking aid features depend on the vehicle trim level and options selected. The possible audio parking aid configurations are as follows: Rear parking aid only Front and rear parking aid Front and rear parking aid, plus active park assist and the side sensing system (also known as flank guard) The rear parkin..
Categories
- Manuals Home
- 6th Generation Explorer Owners Manual
- 6th Generation Explorer Service Manual
- Automatic Transmission - 10-Speed Automatic Transmission – 10R60
- Description and Operation - Identification Codes
- Removal and Installation - All-Wheel Drive (AWD) Module
- New on site
- Most important about car
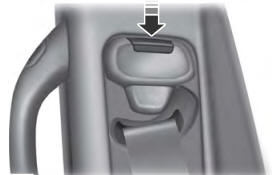
Seatbelt Height Adjustment
WARNING: Position the seatbelt height adjuster so that the seatbelt rests across the middle of your shoulder. Failure to adjust the seatbelt correctly could reduce its effectiveness and increase the risk of injury in a crash.

Copyright © 2025 www.foexplorer.com
