Ford Explorer: Rear Drive Axle/Differential / Removal and Installation - Differential Carrier
Special Tool(s) / General Equipment
.jpg) |
205-220 Installer, Differential Shim TKIT-1985-FH |
| Copper Hammer | |
Removal
-
Remove the differential housing cover.
Refer to: Differential Housing Cover (205-02 Rear Drive Axle/Differential, Removal and Installation).
-
NOTE: The differential bearing caps and differential bearing cap bolts need to be installed in the same location as removed.
-
Mark the differential bearing caps.
-
Remove the differential bearing cap bolts.
-
Remove the differential bearing caps.
-
Mark the differential bearing caps.
.jpg) |
-
Remove the differential carrier, differential carrier bearing cups and the differential shims.
.jpg) |
Installation
-
NOTE: Have the selected shims available at this time. It will be required to hold the differential carrier and the differential carrier bearing cups in until shims are installed.
NOTE: Differential bearing shims are to be installed with the chamfer facing outboard.
Install the differential carrier and the differential carrier bearing cups.
.jpg) |
-
-
Install the RH selected ring gear back lash shim.
-
NOTE: The differential bearing cap bolts should only be finger tight at this time.
Position the differential to the RH side of the differential housing. Install the RH differential bearing cap and the differential bearing cap bolts.
-
Install the RH selected ring gear back lash shim.
.jpg) |
-
Using the special tool and a soft face copper mallet, install the LH selected ring gear back lash shim.
Use Special Service Tool: 205-220 Installer, Differential Shim.
Use the General Equipment: Copper Hammer
.jpg) |
-
NOTE: The differential bearing cap bolts should only be finger tight at this time.
Install the LH differential bearing cap and the differential bearing cap bolts.
.jpg) |
-
Tighten the differential bearing cap bolts.
Torque: 71 lb.ft (96 Nm)
.jpg) |
-
Check the ring gear backlash.
Refer to: Ring Gear Backlash Adjustment (205-02 Rear Drive Axle/Differential, General Procedures).
-
Install the differential housing cover.
Refer to: Differential Housing Cover (205-02 Rear Drive Axle/Differential, Removal and Installation).
 Removal and Installation - Axle Housing Bushing
Special Tool(s) /
General Equipment
205-1066Installer, Bushing
Flat Headed Screw Driver
Removal
NOTE:
Only worn or damaged bushings need to be replaced...
 Removal and Installation - Differential Housing Cover
Materials
Name
Specification
Motorcraft® Ultra Silicone SealantTA-29
WSS-M4G323-A8
Removal
With the vehicle in NEUTRAL, position it on a hoist...
Other information:
Ford Explorer 2020-2025 Service Manual: Removal and Installation - Steering Column Telescopic Motor
Removal NOTE: Removal steps in this procedure may contain installation details. Remove the steering column. Refer to: Steering Column (211-04 Steering Column, Removal and Installation). NOTE: Note the position of the component before removal...
Ford Explorer 2020-2025 Owners Manual: Changing the 12V Battery
WARNING: Batteries normally produce explosive gases which can cause personal injury. Therefore, do not allow flames, sparks or lighted substances to come near the battery. When working near the battery, always shield your face and protect your eyes...
Categories
- Manuals Home
- 6th Generation Explorer Owners Manual
- 6th Generation Explorer Service Manual
- Traction Control
- General Procedures - Rear Camber Adjustment
- Automatic Transmission - 10-Speed Automatic Transmission – 10R60
- New on site
- Most important about car
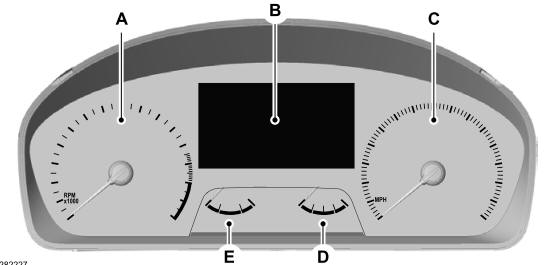
Gauges
4 Inch Display

A - Tachometer.
B - Information display.
C - Speedometer.
D - Fuel gauge.
E - Engine coolant temperature gauge.
