Ford Explorer: Rear Drive Axle/Differential / Removal and Installation - Differential Housing Cover
Materials
| Name | Specification |
|---|---|
| Motorcraft® Ultra Silicone Sealant TA-29 |
WSS-M4G323-A8 |
Removal
-
With the vehicle in NEUTRAL, position it on a hoist.
Refer to: Jacking and Lifting - Overview (100-02 Jacking and Lifting, Description and Operation).
-
Remove the rear axle assembly.
Refer to: Axle Assembly (205-02 Rear Drive Axle/Differential, Removal and Installation).
-
Remove the differential housing cover bolts and the cover.
.jpg) |
-
NOTE: Make sure the machined surfaces on the rear axle housing and the differential housing cover are clean and free of oil before installing the new silicone sealant. Cover the inside of the rear axle when cleaning the machined surface to prevent contamination.
Clean the gasket mating surfaces of the differential housing and the differential housing cover.
.jpg) |
Installation
-
NOTE: The differential housing cover must be installed within 15 minutes of application of the silicone, or new silicone must be applied. If possible, allow one hour before filling with lubricant to make sure the silicone has correctly cured.
NOTE: Care should be taken not to allow RTV sealant spillage in bowl of differential carrier.
Apply a new bead of sealant to the differential housing as shown.
Material: Motorcraft® Ultra Silicone Sealant / TA-29 (WSS-M4G323-A8)
.jpg) |
-
Install the differential housing cover and the differential housing cover bolts.
Torque: 33 lb.ft (45 Nm)
|
-
Install the rear axle assembly.
Refer to: Axle Assembly (205-02 Rear Drive Axle/Differential, Removal and Installation).
 Removal and Installation - Differential Carrier
Special Tool(s) /
General Equipment
205-220Installer, Differential ShimTKIT-1985-FH
Copper Hammer
Removal
Remove the differential housing cover...
 Removal and Installation - Drive Pinion Seal
Special Tool(s) /
General Equipment
205-1061Installer, Pinion Seal 8.8
205-1062Installer, Pinion Seal 8.15
205-199
(T83T-3132-A1)
Installer, Spindle/Axle ShaftT83-4000-ATKIT-198..
Other information:
Ford Explorer 2020-2026 Service Manual: Diagnosis and Testing - Brake System
Symptom Chart(s) Symptom Chart: Brake System Diagnostics in this manual assume a certain skill level and knowledge of Ford-specific diagnostic practices. REFER to: Diagnostic Methods (100-00 General Information, Description and Operation). Condition Possible Sources Actions The red brake warning indicator and the yellow ABS warning indicator a..
Ford Explorer 2020-2026 Service Manual: Removal and Installation - Transmission Fluid Pan, Gasket and Filter
Materials Name Specification Motorcraft® MERCON® ULV Automatic Transmission FluidXT-12-QULV WSS-M2C949-A, MERCON® ULV Removal With the vehicle in NEUTRAL, position it on a hoist. Refer to: Jacking and Lifting - Overview (100-02 Jacking and Lifting, Description and Operation)...
Categories
- Manuals Home
- 6th Generation Explorer Owners Manual
- 6th Generation Explorer Service Manual
- Traction Control
- Engine - 2.3L EcoBoost (201kW/273PS)
- Interior Trim and Ornamentation
- New on site
- Most important about car
Child Safety Locks
When these locks are set, you cannot open the rear doors from the inside.
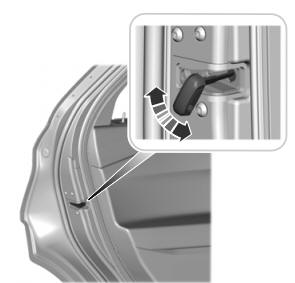
A child safety lock is on the rear edge of each rear door. You must set the child safety lock separately on each door.
Left-Hand Side