Ford Explorer: Climate Control System - General Information / Removal and Installation - Evaporator
Ford Explorer 2020-2025 Service Manual / Electrical / Climate Control System / Climate Control System - General Information / Removal and Installation - Evaporator
Removal
NOTICE: Use extreme care when releasing the tabs on the climate control housing, or the tabs can be easily damaged.
NOTE: Removal steps in this procedure may contain installation details.
-
Remove the climate control housing.
Refer to: Climate Control Housing (412-00 Climate Control System - General Information, Removal and Installation).
-
Remove the screws and the thermostatic expansion valve.
Torque: 71 lb.in (8 Nm)
.jpg) |
-
Remove the climate control housing seal.
.jpg) |
-
Remove the screws, release the tab and remove the evaporator tube cover.
.jpg) |
-
Remove the heater tube dash panel seal, the screws and the heater tube bracket.
.jpg) |
-
Remove the screws, release the tabs and remove the evaoprator cover.
.jpg) |
-
Remove the evaporator core from the climate control housing.
.jpg) |
-
Remove the evaporator core tempreature sensor from the evaporator core.
.jpg) |
Installation
-
To install, reverse the removal procedure.
 Removal and Installation - Driver Temperature Door Actuator
Removal
Remove the glove compartment.
Refer to: Glove Compartment (501-12 Instrument Panel and Console, Removal and Installation).
Remove the screws and the driver temperatur..
 Removal and Installation - Evaporator Temperature Sensor
Removal
NOTE:
The evaporator temperature sensor is available only as part of the evaporator.
Remove the evaporator.
Refer to: Evaporator (412-00 Climate Control System - General Informa..
Other information:
Ford Explorer 2020-2025 Service Manual: Description and Operation - Pump Assembly
Overview Item Description 1 Transmission fluid pump drive gear 2 Transmission fluid pump idler gear 3 Transmission fluid pump assembly 4 Transmission fluid filter The transmission fluid in the sump area at the bottom of the transmission case flows through a transmission fluid filter to th..
Ford Explorer 2020-2025 Service Manual: Disassembly and Assembly of Subassemblies - Cylinder Head
Special Tool(s) / General Equipment 303-1249Valve Spring CompressorTKIT-2006UF-FLMTKIT-2006UF-ROW 303-1567Sizer, Teflon SealTKIT-2010C-FLM 303-300 (T87C-6565-A) Set, Valve Spring CompressorTKIT-1988-FESTIVAT88C-1000-STTKIT-1988-TRACERTKIT-2009TC-F 303-350 (T89P-6565-A) Compressor, Valve SpringTKIT-1990-LMHTKIT-1989-FTKIT-1989-FMTKIT-1989-FLM 303-472 (T94P-65..
Categories
- Manuals Home
- 6th Generation Explorer Owners Manual
- 6th Generation Explorer Service Manual
- Description and Operation - Jacking and Lifting - Overview
- Traction Control
- Fuel Filler Funnel Location & Running Out of Fuel
- New on site
- Most important about car
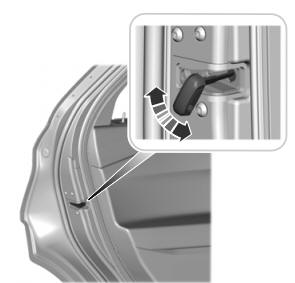
Child Safety Locks
When these locks are set, you cannot open the rear doors from the inside.

A child safety lock is on the rear edge of each rear door. You must set the child safety lock separately on each door.
Left-Hand Side
Copyright © 2025 www.foexplorer.com
