Ford Explorer: Battery, Mounting and Cables / General Procedures - Battery Charging
Charging
.jpg) WARNING:
Before beginning any service procedure in this section,
refer to Safety Warnings in section 100-00 General Information. Failure
to follow this instruction may result in serious personal injury.
WARNING:
Before beginning any service procedure in this section,
refer to Safety Warnings in section 100-00 General Information. Failure
to follow this instruction may result in serious personal injury.
NOTE: Batteries will discharge due to normal parasitic key off-loads when the vehicle is on a dealer lot or parked by the customer for an extended period of time. Vehicles still in dealer inventory or in long-term storage may be driven short distances with heavy electrical loads. Over a period of time (30 days or more), this could result in vehicles having shallow or deeply discharged batteries.
NOTE: The vehicle charging system is designed to supply the electrical power needed to maintain the battery near full charge during normal vehicle use. The charging system is not capable of bringing a deeply discharged battery back to near full charge in a short amount of time such as allowing the vehicle to idle for 15 minutes to recharge the battery. Use an external charger to charge discharged batteries.
NOTE: Cold batteries will not readily accept a charge. Allow batteries to warm to approximately 5°C (41°F) before charging. This may require 4 to 8 hours at room temperature.
Charger Connected to a Chassis Ground - Preferred Method Primary Battery
-
For hybrid vehicles, disconnect the auxiliary negative ground cable.
Refer to: Battery Disconnect and Connect (414-01 Battery, Mounting and Cables, General Procedures).
-
Connect the positive (red) charger clamp to the positive battery post.
-
Connect the negative (black) charger clamp to a battery chassis ground.
-
Charge the battery following the battery charger manufacturer's instructions.
Charger Connected to Battery Posts
NOTE: The battery monitoring sensor must relearn the battery's state of charge after charging, refer to Battery State of Charge in section 414-00.
-
Disconnect the battery.
Refer to: Battery Disconnect and Connect (414-01 Battery, Mounting and Cables, General Procedures).
-
Connect the positive (red) charger clamp to the positive battery post.
-
Connect the negative (black) charger clamp to the negative battery post.
-
Charge the battery following the battery charger manufacturer's instructions.
Auxiliary Battery (Hybrid Vehicles)
-
Disconnect the auxiliary battery.
Refer to: Battery Disconnect and Connect (414-01 Battery, Mounting and Cables, General Procedures).
-
Connect the positive (red) charger clamp to the positive battery post.
-
Connect the negative (black) charger clamp to the negative battery post.
-
Using an Absorbed Glass Mat (AGM) battery charger, charge the battery for one hour at 2 amps.
 Diagnosis and Testing - Battery
General Equipment
Diagnostic Battery Charger
Use Ford approved battery test equipment.
Midtronics MDX-650 or P-300/P-600/490/1050
Midtronics GRX-3590 or 3000
Diagno..
 General Procedures - Battery Disconnect and Connect
Special Tool(s) /
General Equipment
Interior Trim Remover
Disconnect
NOTE:
When the battery is disconnected and connected, some
abnormal drive symptoms may occur while the vehicle relea..
Other information:
Ford Explorer 2020-2025 Owners Manual: About Adaptive Cruise Control With Stop, Go and Lane Centering. About Intelligent Adaptive Cruise Control
Adaptive cruise control with stop and go uses radar and camera sensors to adjust the speed of your vehicle to maintain a set gap from the vehicle in front of you in the same lane while following it to a complete stop. You can also engage the system to follow a vehicle in front of you and adjust set speed while stopped...
Ford Explorer 2020-2025 Service Manual: Removal and Installation - Axle Assembly
Materials Name Specification Slip Yoke Grease5L3Z-19A506-A - Removal Drain the front differential fluid. Refer to: Differential Draining and Filling (205-03 Front Drive Axle/Differential, General Procedures). Remove the front RH halfshaft only...
Categories
- Manuals Home
- 6th Generation Explorer Owners Manual
- 6th Generation Explorer Service Manual
- Engine - 2.3L EcoBoost (201kW/273PS)
- General Procedures - Rear Camber Adjustment
- General Procedures - Transmission Fluid Drain and Refill
- New on site
- Most important about car
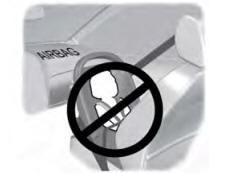
Children and Airbags
WARNING: Airbags can kill or injure a child in a child restraint. Never place a rear-facing child restraint in front of an active airbag. If you must use a forward-facing child restraint in the front seat, move the seat upon which the child restraint is installed all the way back.

